You’ve probably heard the saying that “the devil is in the details” and I couldn’t agree more! There’s nothing more disheartening than walking into a newly remodeled kitchen to see glaringly unfinished or hastily completed details. Details really do matter and they can often be the difference between a good kitchen and a great kitchen. So, here are a few of my favorite tips to make sure your kitchen is dressed to the nines, including the cuff links.
- Select the right cabinet hardware. Ahhh cabinet hardware…the never ending sea of nickel, bronze and chrome “cabinet jewelry”. Clients often become like deer in the headlights staring at the array of choices. What color is best? What size is correct? Can I mix different sizes and styles? To make matters worse, if they are frazzled at the end of a long kitchen remodel, they often select the first thing they see or the least expensive option just to get it over with. Or, even worse, they leave the cabinets “naked” and don’t install hardware at all.

Sleek chrome hardware accents this modern cabinetry perfectly
Unless your cabinets are very modern euro style, they would benefit aesthetically from having beautiful hardware. After all is said and done, cabinet hardware often becomes an afterthought, when it should actually be a carefully considered and deliberate detail. Think of your cabinet hardware like the jewelry accessorizing your little black dress or the cuff-links and watch that compliment your tailored suit. The outfit feels incomplete without them. So, what’s first in deciding on cabinet hardware? Let’s begin with color and style. Is your kitchen sleek and modern? For modern or transitional styles, lean toward chrome, nickel, or even a solid matte black pull with very clean lines. Antiqued gold is also making a dramatic comeback, as well. The most important consideration for a modern or transitional kitchen is to select a pull or knob with clean and sleek lines. Is your kitchen more traditional? Brushed nickel or bronze hardware works well with this style. In traditional styling, more detailing is typical on pulls and knobs. Is your kitchen rustic? Bronze or black hardware works well with rustic styles. With all styles, it’s important to select a color for your cabinet hardware that contrasts with the cabinet color. For example, I would not pair a dark bronze knob with a dark chocolate cabinet. The knob would virtually disappear and everything would be the same color. Having some contrast is best.

Gold hardware contrasts beautifully against transitional gray cabinetry. Martha Stewart cabinets in Sharkey Gray.
So now that we’ve nailed down color, should you use knobs or pulls, or a combination of both? Personally, I am an advocate for mixing knobs and pulls to achieve a more interesting look. In a large kitchen, I tend to shy away from using all knobs, because they tend to look small and somewhat insignificant in the grand scheme of things (it’s fine to use all knobs on a smaller bath cabinet, however, because the cabinet doors and drawers tend to be smaller). Even though I try not to use all knobs, using all pulls can work well. For example, in modern styling, using all pulls works quite well to emphasize clean lines. There is no exact science to cabinet hardware. Much of it comes down to personal preference, but taking the time to really think it through is critical for a beautifully finished kitchen.

Mixing knobs, pulls and cup pulls on this kitchen island adds interest
- Think about the sink. Another detail that is often selected in haste is the kitchen sink. I’m consistently surprised when clients agree to selecting whatever standard undermount sink that the granite yard has in stock “just to make it easy.” All too often, the sink is already installed when the client realizes that they really preferred something deeper, or with two bowls instead of one. Take the time to really think about how your family uses the kitchen sink. Do you wash dishes by hand or in the dishwasher? What depth is important to you? If you wash dishes by hand, chances are that you prefer a much deeper sink with two bowls. How much time are you willing to invest to maintain the finish on the sink that you select? A gleaming copper sink looks amazing in a rustic kitchen, but cleaning it and maintaining the finish can be quite labor intensive. What style of sink would look best in your kitchen? A sink with rounded edges works great in a traditional kitchen, but a sink with clearly defined square corners looks sleek in a transitional or modern kitchen.

This modern sink steals the show in a contemporary kitchen
A great way to incorporate some extra personality into your kitchen is to use an apron front, or farmhouse sink. Stainless steel takes an apron front sink from traditional to transitional style and porcelain sinks tend to look more traditional. Farmhouse sinks are highly desirable these days, but many homeowners don’t plan far enough in advance to incorporate one. A special sink cabinet has to be ordered to accept an apron front sink. Often times, the homeowner waits until the cabinets are already ordered to decide on a sink. At this point, it’s too late to select an apron front sink without remaking the sink cabinet. Be sure to let your cabinet designer know well in advance if you prefer a farmhouse sink. The kitchen sink is one of the most utilized items in your kitchen; be sure not to gloss over this important detail when making your selections.

A classic farmhouse sink serves as a focal point in this traditional kitchen
- Beautifully finished backsplashes matter. If selecting cabinets is the most important decision to make in a kitchen, then selecting a backsplash is definitely a close second. The kitchen backsplash can be the star of the kitchen or it can be the eyesore. There are a few things to consider when selecting a backsplash. First, will the backsplash be a solid color or will it have a pattern? If the backsplash is a solid, consider how it contrasts again the cabinets and the countertops. For a more subtle look, choose tones that are similar to the cabinets. For a more dramatic look, choose a color that contrasts with the cabinets. I prefer some contrast with the countertops and the backsplash, even if it’s subtle. For example, a white cabinet with a white backsplash, white grout and a solid white countertop all blends together and can become quite boring. It’s more appealing to have at least some detailing to entertain the eye, even if it’s just interesting veining in the stone or a slightly contrasting grout color on the backsplash, such as light gray grout with white tile. That brings us to the second point to consider for your backsplash; different grout colors have the ability to give you COMPLETELY different looks for a backsplash. Be sure to consider grout very carefully and never allow your installer to select a grout color and install it without your input. This can cause quite an unwelcome surprise! For example, a white subway tile with matching white grout looks ENTIRELY different than a white subway tile with dark gray grout.

Light gray-green grout picks up the cabinet color and adds subtle interest to this kitchen. One not so great detail is the mismatched outlet plate. Match the outlet color to your tile, if possible, to make it “disappear”.
Dark grout creates a distinctive pattern and light grout minimizes the pattern. If you are in doubt about what color will look the best, ask your installer to make a simple 12″ x 12″ mock up board on plywood with each grout color. Many times, the tile showroom already has mock up boards prepared with grout to assist customers with this choice. In some circumstances, emphasizing the pattern may be desirable and in others it can cause the backsplash pattern to clash with a highly patterned countertop.
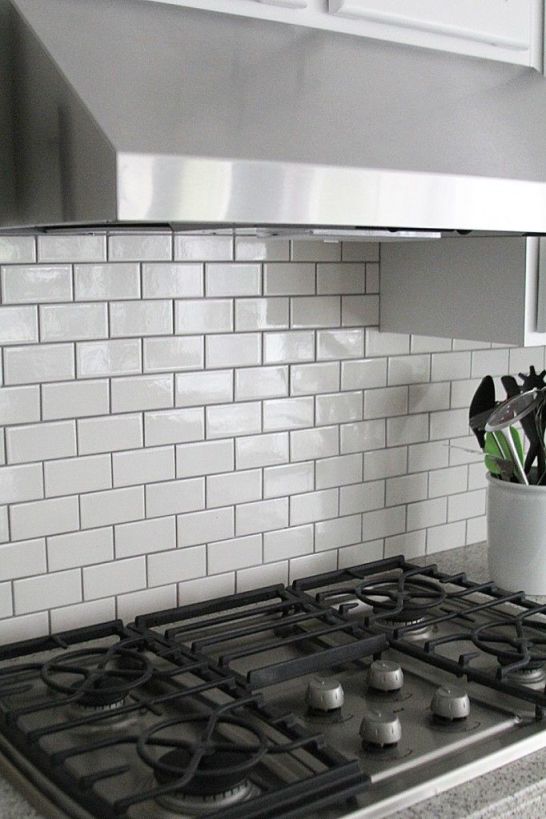
Dark grout emphasizes the pattern of the subway tile
Which brings us to my third backsplash tip; choose one distinctive pattern for your kitchen, whether it is the countertop or the backsplash, and let that be the star. A distinctive pattern on a backsplash works well with a solid or subtle countertop pattern and a more solid or subtle backsplash works well with a highly patterned countertop. Distinctive patterns on both can quickly become too busy. One way to give a solid backsplash more interest is to install it in a pattern, such as a herringbone pattern for a transitional kitchen or a soldier stack pattern for a more modern kitchen.

Soldier stacked backsplash tile emphasizes the clean modern lines in this kitchen, while the stainless farmhouse sink serves as a focal point.
Finally, my fourth tip for backsplashes is to properly finish the exposed or raw tile edges of your backsplash. This is my pet peeve because it’s a distracting eyesore to see unfinished edges, even in a gorgeous kitchen. Would you walk around in an unhemmed skirt or pants with the raw edges of fabric showing? Of course not! So, finish the exposed edges of tile with coordinating pencil rounds, silver schluter strips or bullnosed tile edges.

Pencil round tiles provide a clean finished edge to a penny round tile backsplash. Texture adds interest to an all-white design.
Be sure to order these critical pieces when you place your backsplash tile order. It gives your kitchen a polished and professionally finished look. When designing your perfect kitchen, be sure to take the time to consider your backsplash color, pattern, grout color and finishing pieces to create a beautiful result.

Metal schluter strips create a sleek finished edge on this contemporary backsplash
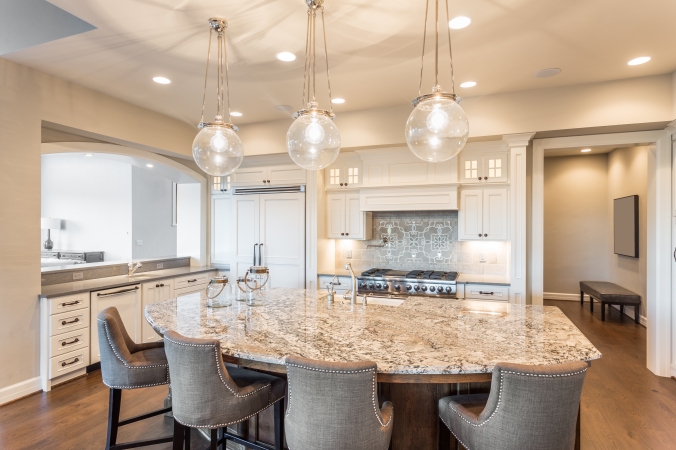
- Style and scale are key in selecting decorative lighting fixtures. As I mentioned in my very first blog, scale is something that many people struggle with. It’s also critical when selecting decorative light fixtures for your designer kitchen. So, how do you determine the right size for your decorative fixtures? First, consider where they will hang. If you are hanging pendants over an island, measure the island to determine it’s size. Let’s say, for the sake of this example, that the island measures 42″ x 62″. If there were two fixtures hanging over this island, the optimal size would be between about 10″ and 12″ in diameter for each decorative fixture.

Two brushed nickel pendants add interest and anchor the kitchen island perfectly
Another solution would be to hang three 6″ to 8″ diameter pendants over the island. This is pleasing to the eye because the visual weight of the pendants is distributed evenly across the island. Finally, using one 36″ to 42″ oblong fixture would look great over this 62″ island, as well. For proper spacing between multiple fixtures that hang in a row, hang the fixtures at least their own diameter apart or up to a maximum of about twice their diameter apart. For example, fixtures with a 15″ diameter should hang between 15″ and 30″ apart (or a few inches more) for maximum appeal.
These three pendants are perfectly spaced and add loads of character to this transitional kitchen. The high ceilings are accentuated by the vertical lines of the pendants.
The length of the light fixture is also important. For a vaulted ceiling, consider a fixture that is longer vertically than it is wide. It’s important to fill open vertical space with a longer decorative fixture for balance, as well. For a ceiling that is 8′ or 9′ tall, leave between 32″ and 36″ of open space between your countertop or tabletop and the bottom of the decorative fixture. To quickly determine the diameter of a dining area fixture, measure the space. For a 12′ x 12′ dining area with an 8′ ceiling, add 12 + 12= 24. Therefore, your decorative fixture should be around 24″ in diameter. It’s fine if it’s one or two inches larger, as well. This formula is useful in determining a general idea of what the diameter should be. If the ceiling height is over 8′ tall, add 2″ to the diameter for each additional foot of ceiling height over 8′. For example, if the room is 12′ x 12′ with a 9′ ceiling height, add 12 + 12 + 2= 26″ diameter fixture. For ceiling heights over 9′, consider a fixture with multiple tiers to help fill the additional vertical space.
Ok, that felt like a lot of math, so let’s move on to style! Selecting an appropriate style for your decorative fixtures is also very important in achieving a cohesive kitchen design. Larger decorative lighting fixtures serve as focal points and this is one area where I would focus heavily on quality and not so much on cost. You can get away with less expensive cabinet hardware and subway tile, but don’t cut corners with your decorative lighting fixtures or it will show. For a transitional or modern kitchen, consider chrome, nickel or even burnished gold finishes.

Geometric modern pendants add style to this kitchen
Chandeliers or pendants that incorporate shell, decorative glass or wooden beads can be very interesting in a transitional space. Try to think outside the box with decorative lighting and dare to go with something other than a predictable glass mini pendant. For a modern kitchen, consider a fixture with clean lines, square or cylinder shapes or barrel shades and a sleek or matte finish. For a traditional kitchen, consider antique silver, bronze or black iron finishes. Traditional styles can include lantern shapes, decorative crystal fixtures or classic chandeliers with fabric shades.

This stunning wooden beaded chandelier from Pottery Barn is anything but ordinary.
- Consider cabinet detailing such as crown molding and matching end panels. For a modern European kitchen, there’s nothing more beautiful than sleek slab cabinet doors and flat finished cabinet ends. However, with transitional and traditional cabinetry styles, additional detailing can make a giant impact on the overall design of a kitchen. I strongly encourage my clients to incorporate crown molding on upper cabinets in traditional and transitional kitchens. It provides an extra finishing touch that is the icing on the cake. I equate a transitional kitchen that doesn’t have crown molding to a business man wearing dress pants without a belt. It looks like something is missing. Crown molding is an excellent way to add an extra detail to your cabinets that reinforces the kitchen’s style. For shaker cabinets, a flat 35 degree crown or a gracefully curved cove crown work beautifully to add an extra finishing touch without fussy detailing. For traditional cabinets, crown molding is a necessary decorative element that can be quite detailed, like a finely carved piece of furniture. So, unless your kitchen is very modern, don’t skip the crown molding. Finally, I strongly recommend matching cabinet end panels on traditional and transitional style cabinets.

Matching paneled ends and crown molding add impressive detailing to this stunning white kitchen.
In simple terms, this means that instead of the cabinet ends being plain and flat, they match the paneled design on the cabinet door. The exception to this rule is shaker style cabinetry; matching end panels may or may not be incorporated with the simple details of this style. So, what’s the purpose of matching end panels, anyway? Matching end panels give a kitchen a customized and tailored look that steps up the entire kitchen design a notch. Paneled backs on a kitchen island or peninsula, called wainscoting, also add incredible tailoring that elevates the styling of an average kitchen to a designer level. So, when considering your cabinet style, don’t just think about the door style, the crown molding and paneled ends are just as important to achieving a designer look.

Paneled ends and corner posts give a regal feeling to this kitchen island
Designing a kitchen is a labor of love and an expensive endeavor. Many well-meaning homeowners take a tremendous amount of time to select cabinets, countertops and appliances, but gloss over the remaining details without much thought. Consider the details of your kitchen masterpiece carefully, because it is just that…a masterpiece. Putting in a little extra time to consider the cabinet hardware, sink, lighting fixtures, backsplash tile and cabinetry details are just the extra boost that your kitchen needs to bring on the “wow factor”. So set aside a little extra time to elevate your kitchen from good to great! I can assure you that it will be time well spent.

Wow, this paragraph is nice, my sister is analyzing these kinds of things, so
I am going to let know her.
LikeLiked by 1 person
Thank you so much Jack! It makes my day that you are sharing this with your sister! 🙂
LikeLike
Saved as a favorite, I really like your website!
LikeLiked by 1 person
Thank you so very much! This is my very first blog ever, so that means a lot!
LikeLike
I’ve been browsing on-line more than 3 hours lately, yet
I by no means found any attention-grabbing article like yours.
It is beautiful price sufficient for me. Personally, if all
website owners and bloggers made excellent content as you probably did, the net will likely be a lot more useful
than ever before.
LikeLiked by 1 person
Wow Kill! Thank you so much! You have no idea what this comment meant to me. This is my very first blog. My goal is to have my readers to walk away feeling like they got something valuable or at least interesting from my writing. Your comment really hit it out of the park for me and made my night. Seriously! Thank you! 🙂
LikeLike
Wow, fantastic blog layout! How long have you been blogging
for? you make blogging look easy. The overall look of your
web site is excellent, as well as the content!
LikeLike
Wow, thanks so much! I just started blogging in April. 🙂 I’ve always enjoyed writing, though. I used a template on WordPress for my blog. They have some awesome ones and my stepson designed our website. I think he’s pretty talented, don’t you? 😉
LikeLike
Hi, i think that i saw you visited my web site thus i came to “return the favor”.I’m attempting to find things to
improve my site!I suppose its ok to use a few of your ideas!!
LikeLike
Thanks so much for the compliment! So glad you enjoyed it!
LikeLike
I’m curious to find out what blog platform you’re using? I’m having some small security problems with my
latest blog and I’d like to find something more
secure. Do you have any solutions?
LikeLike
Hi there, I use WordPress. It’s very user friendly and allows the blogger to easily insert photos within the text. I use a template that WordPress created, also. I’ve never blogged before and WordPress made it easy! Best of luck on your blog and thanks so much for visiting! 🙂
LikeLike
Hi outstanding website! Does running a blog similar to this require a great deal of
work? I’ve no knowledge of programming but I
was hoping to start my own blog in the near future. Anyway, should you have any recommendations or techniques
for new blog owners please share. I understand this is off subject however I just wanted to ask.
Cheers!
LikeLike
Hi there, Thanks so much for your compliments! I recommend WordPress for a blog site. They make it easy to insert photos in your blog, which can be difficult on other sites. Blogging does take a lot of time, but if you blog on a subject that you love it’s very rewarding! I’d recommend that you read other blogs about “how to start a blog”. I learned so much from doing that! Best of luck to you and thanks again for visiting my blog! 🙂
LikeLike
you’re in reality a good webmaster. The site loading pace is incredible.
It kind of feels that you are doing any unique trick. Furthermore,
The contents are masterwork. you’ve done a magnificent task on this subject!
LikeLike
Thank you very much! I’m so glad you enjoyed the blog.
LikeLike
This paragraph gives clear idea for the new users of blogging,
that truly how to do running a blog. http://www.indiatips.in/article.php?id=151
LikeLiked by 1 person
Thanks so much for reading my blog and for the kind compliment!
LikeLike